The io leg trades on Entropy and the xyz leg on TRADE.XYZ. Each cycle creates trading activity on both venues. Any rewards depend on their respective programs.
cycle with a $300 leg
EntropyThe venue for the io leg. Our referral code is cryptogains; tier and rebate eligibility depend on the venue's current terms.
TRADE.XYZThe venue for the xyz leg, a HIP-3 venue on Hyperliquid. Trading uses your Hyperliquid account.
Explore potential turnover
Entropy per weekday—
TRADE.XYZ per weekday—
Both venues over 22 weekdays—
—
Real market volumeThe bot trades market spreads rather than trading between your own accounts. Activity on both venues is a consequence of those trades. Entropy and TRADE.XYZ determine their own reward programs and timelines.
Versions
Choose your approach
GREEN · AVAILABLE
Turnover with a profit target
$15–25ktarget daily Entropy turnover
90%profitable closed trades
+$3.167-day recorded result after fees
Enters only with an edge after fees
Targets profitable exits; after 10 hours, uses a price-limited exit if convergence has not occurred
For traders prioritizing the cost of turnover
VOLUME · AVAILABLE
More turnover, measurable cost
$0turnover builds faster
$50–200ktarget daily Entropy turnover
$18 / $100ktarget cost of Entropy turnover after expected rebate: $1 million in turnover costs approximately $180
≤15 minholding period to keep capital active
More frequent entries, including smaller spreads
Faster exits rather than waiting for ideal convergence
For traders seeking more activity on Entropy and TRADE.XYZ
Daily turnover ranges and VOLUME cost are targets, not verified results or hard loss limits. Actual results depend on capital, wallet count, liquidity and market conditions; costs can exceed the target. Expected rebate is not a confirmed payment. GREEN historical figures refer to the fleet journal of September 24–October 1, 2026, across 5 wallets.
Mechanics
A cycle in 4 steps
Find a spread
The same stock has different prices on Entropy and TRADE.XYZ
Open two legs
Buy on the cheaper venue and sell on the more expensive venue in one order batch
Manage execution risk
Paired exposure is hedged, with exchange-side protective orders
Seek a profitable exit
When prices converge, close the position and record volume on both venues
Trades the market across two independent order books
cycle result+$0.00
market tradeshedged exposureprofit-target exits
Build or deploy
Start without building from scratch
Months of development, thousands of tests, and an operating server fleet are already in place.
Build yourself: time to launchmonths
With Entropy GREENone evening
Build yourself: cost of mistakesunknown
With Entropy GREENtested with our own capital
✓Execution across 2 venues
✓Unbalanced-leg recovery
✓Sizing against order-book depth
✓Profit-target exits
✓Entry windows across multiple machines
✓One-click updates with rollback
✓≈2,900 automated tests
✓Exchange reconciliation
Results
Our fleet's trading journal
September 24–October 1, 2026: main fleet with 57 wallets and a GREEN server with 5 wallets
GREEN · share of profitable closed trades
EWY long xyz
100%
DRAM long io
93%
NBIS long xyz
88%
EWY long io
85%
SNDK
78%
$1.39m7-day fleet turnover on Entropy, with comparable activity on TRADE.XYZ
+$3.167-day GREEN result after fees: $39k turnover across 5 wallets
Journal-based figures including fees. About 3 in 10 entry attempts do not fill completely; the bot closes that exposure at a small loss, included in the result. Profit is not guaranteed.
Launch
A guided setup
Step-by-step instructions, from registration to your first trade.
Server
SurferCloud, Japan · 4 cores, 4 GB · Ubuntu
9 wallets
Hyperliquid, starting at $100–150 USDC per wallet. Deposit through Entropy
Referral disclosure: venues may pay us from their share of trading fees. Using our links does not add a fee charged by us. Any exchange discount depends on current eligibility and terms.
Setup guide · GREEN / VOLUME · latest version
From registration to your first trade
Fifteen steps in order. Wallet setup and registration take about an hour; server setup takes another 20–30 minutes. Check off completed steps: your progress is saved in this browser.
Use both of our referral codes: cryptogains on Entropy and CRYPTOGAINS on Hyperliquid. Without confirmed Entropy referral access, the bot will not open new trades. If you have not linked the codes manually, builds with auto-binding enabled will try to apply missing referrals and verify the result. This can fail: an existing referrer is not replaced, and automatic Entropy enrollment requires the main wallet key, not an API-agent key. You can instead complete enrollment manually in the official interfaces. Never send keys to this website. Hyperliquid referral binding is separate from the Entropy entry check.
03
Deposit through Entropy
The bot uses USDC on Hyperliquid and sizes trades according to balance. Recommended balance per account: VOLUME — $150 USDC; GREEN — $250 USDC. You can deposit less: trade sizes and available turnover will be limited by your balance and minimum order sizes. This is a setup guideline, not a profit guarantee.
Main option: through Entropy:
On entropy.io connect your wallet and select funding (Deposit).
Deposit USDC and wait for it to arrive.
Repeat for every wallet.
!
Check the current network and minimum deposit in the official deposit screen before sending funds. Fund wallets only with capital you intend to use for trading.
04
Register each wallet on Hyperliquid using the link
Our recorded wallets showed fees of 0.864 bps versus 0.900 without CRYPTOGAINS. The discount and volume limit remain subject to Hyperliquid's current referral rules.
https://app.hyperliquid.xyz/join/CRYPTOGAINS
!
First complete your deposit through Entropy and wait for it to be credited. Do not try to activate the Hyperliquid referral code before funding. If you see “Need to Deposit”, finish step 03 and check your balance.
Open the link in the browser connected to your first wallet.
Click Connect, select your wallet, and sign in.
Confirm CRYPTOGAINS if the website prompts you.
Check that app.hyperliquid.xyz/referrals shows CRYPTOGAINS.
Disconnect the wallet, connect the next one, and repeat for each wallet.
×
Set the referral before the wallet's first trade. If it has already traded, check eligibility with Hyperliquid; a new wallet may be required.
The xyz markets, such as xyz:SNDK, belong to TRADE.XYZ on Hyperliquid. The bot uses the same Hyperliquid account.
The xyz leg records trading volume against your wallet, comparable to the Entropy leg.
If TRADE.XYZ announces a rewards program, follow its requirements, such as connecting wallets on its website.
i
Venues control rewards and airdrops. We do not promise them. The bot creates market activity; participation depends on your choice and the venue's rules.
06
A signing key for each wallet
The bot needs the wallet address and an order-signing key: either the owner's key or a Hyperliquid API-agent key. Referral verification may separately require owner authentication.
Option A: wallet private key. Export the private key in your wallet settings (MetaMask: Account details → Show private key). You do not need to create an API agent for this option.
Option B: API-agent key. An agent can trade but cannot withdraw funds:
Open app.hyperliquid.xyz/API and connect your wallet.
Enter an agent name, such as green-1, then click Generate.
Copy the agent's private key: it is shown only once.
Click Authorize API Wallet and sign in your wallet.
For each wallet, record a pair: wallet address + key.
!
Do not enter a seed phrase. Store keys in a password manager, not in chat messages or ordinary notes.
Part 2
Server
The bot runs continuously on a rented Linux server. Your personal computer does not need to stay on.
07
Rent a server
Choose a location with low measured latency to Hyperliquid. Japan is the recommended starting location in this setup.
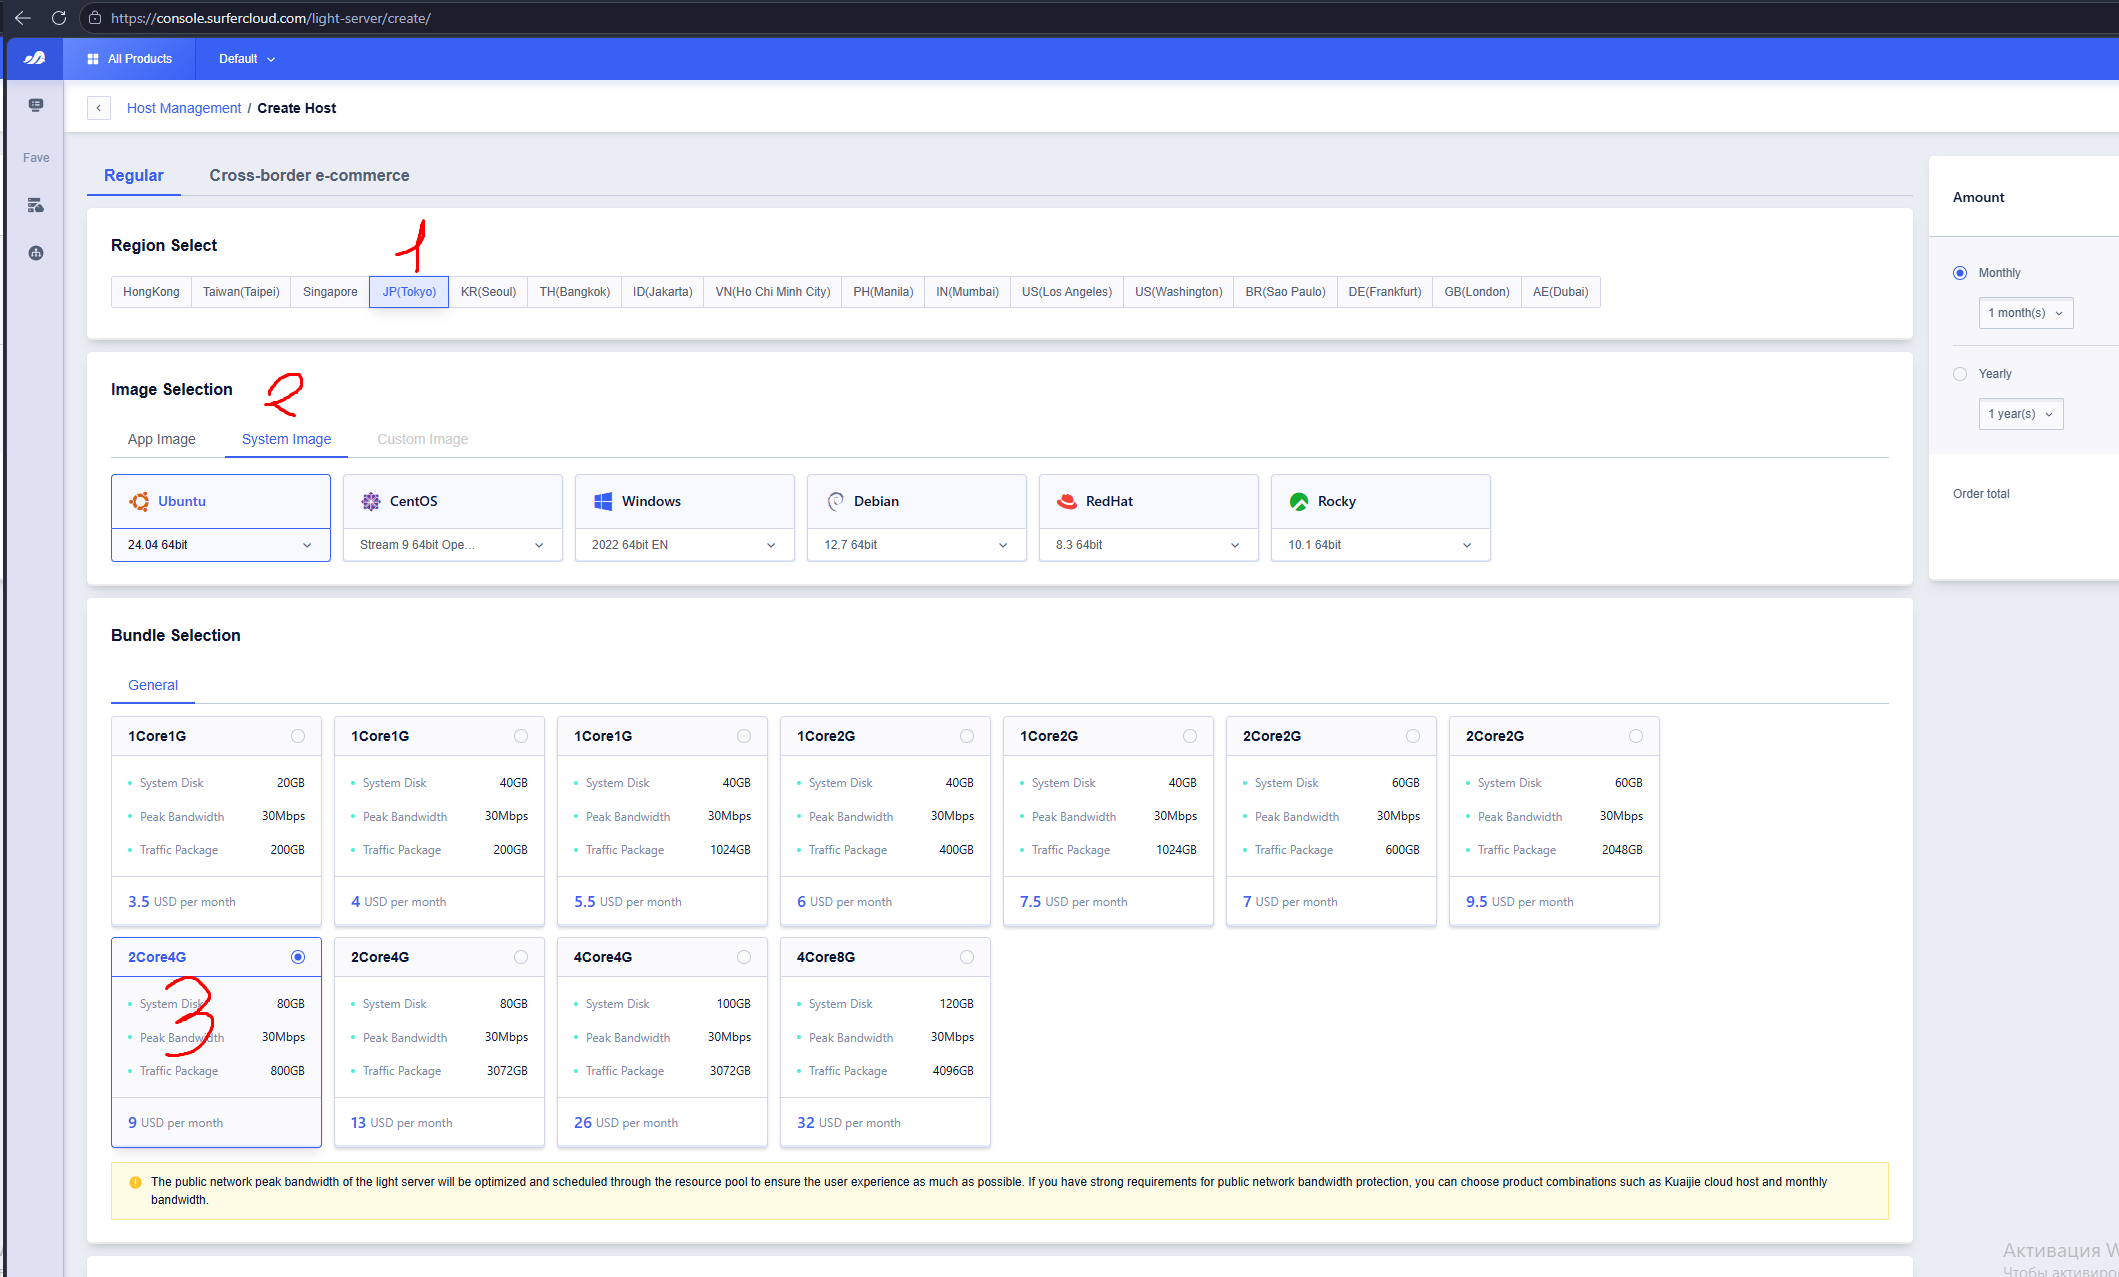
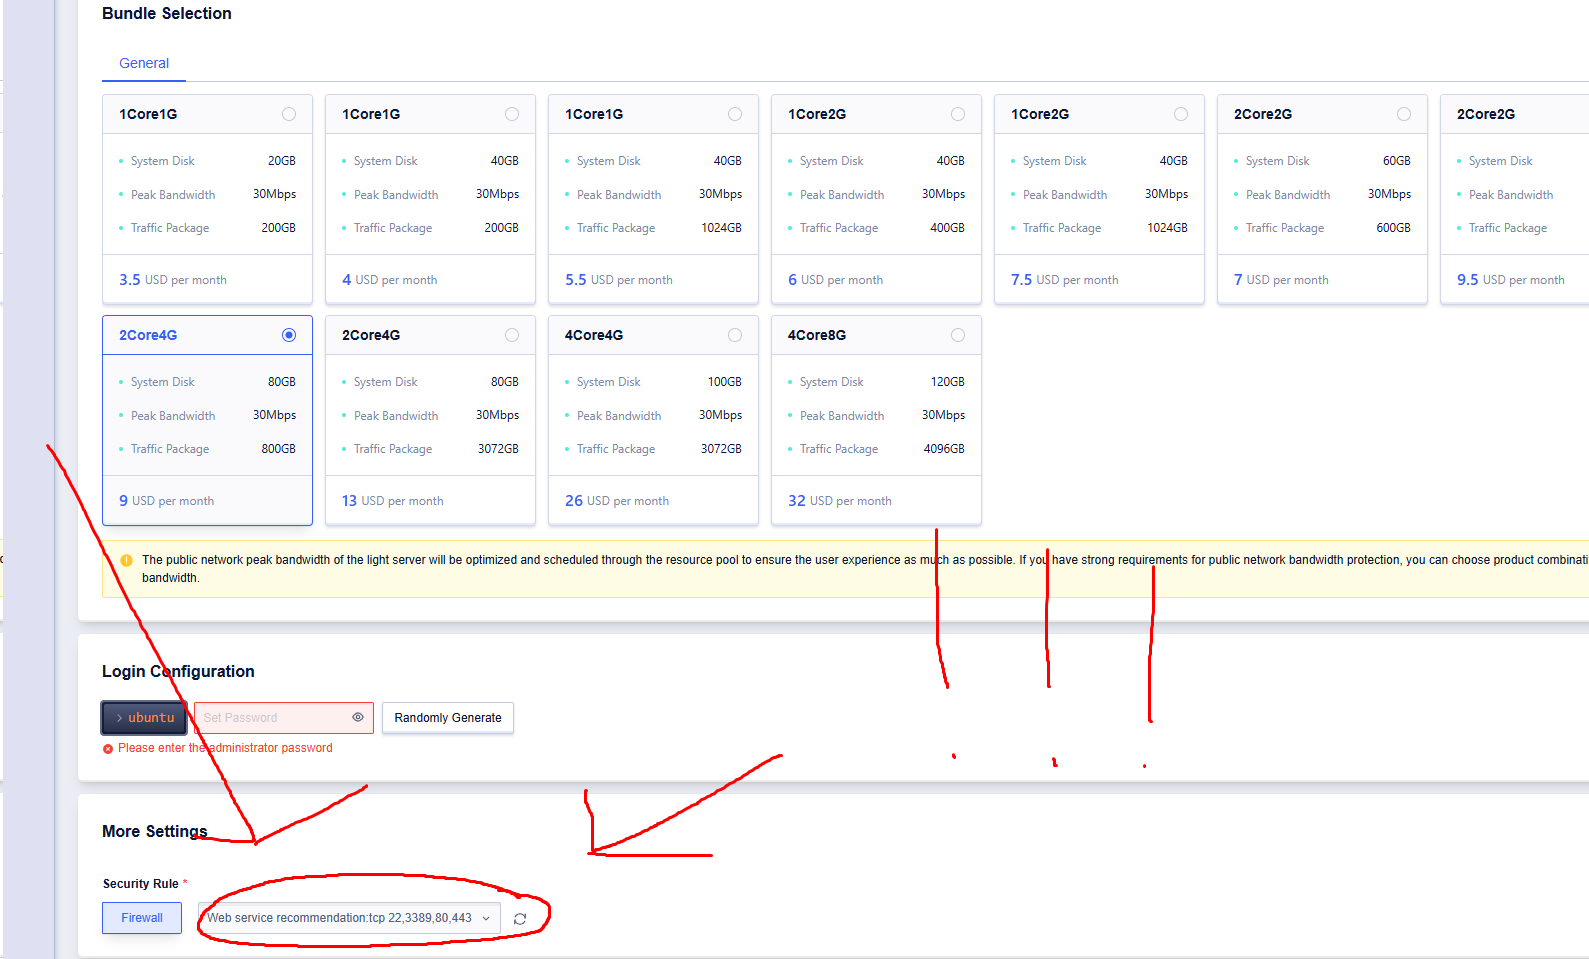
1. Region: JP (Tokyo). 2. System Image → Ubuntu 24.04 64bit. 3. General → 2Core4G: 2 CPU cores, 4 GB RAM, 80 GB disk, 800 GB traffic. The screenshot shows $9/month; check the current price before paying.4. Login: ubuntu; generate and safely store a unique password. 5. More Settings → Security Rule: the screenshot uses “Web service recommendation: tcp 22,3389,80,443”. Keep the firewall enabled. For Ubuntu, port 3389 (Windows RDP) is unnecessary: remove it from your custom rule. Allow TCP 22 only from your IP; TCP 80/443 are for a public HTTPS dashboard. Never expose port 8765 or open all ports. If your installer uses a different gateway port, open only that documented port.
08
Connect and change your password
Open Terminal on Mac or Linux, or PowerShell on Windows.
on your computer
ssh ubuntu@SERVER_IP
Replace SERVER_IP with the address from step 7 and log in. A connected server prompt looks like:
ubuntu@entropy-green:~$
on the server · enter the new password twice; characters stay hidden
sudo passwd ubuntu
09
Download the archive directly on your server
Recommended: run the download command in your SSH session from step 8. No download to your computer or SCP transfer is needed.
Choose GREEN or VOLUME and run only the matching commands below on the server. These commands do not install or start the bot. Do not run both versions with the same wallet.
The supplied URLs use HTTP, not encrypted HTTPS. The links always point to the latest version. Before extracting, compare the archive's SHA-256 (sha256sum entropy-green-latest.tar.gz) with the checksum from the owner's message; all checksums are in SHA256SUMS, signed with the update-channel key.
cd ~
rm -rf entropy-volume && mkdir entropy-volume && tar xzf entropy-volume-latest.tar.gz -C entropy-volume --strip-components=1 && cd entropy-volume
Next, continue to step 10. GREEN uses install-green.sh; VOLUME uses install-volume.sh.
Alternative: upload from your computer
Download one archive with the buttons above. Run the matching SCP command on your computer from the folder containing the file; replace SERVER_IP with your server address. Then return to SSH and use the extraction command above.
On your computer · in the folder containing the archive
If curl is not installed: sudo apt-get update && sudo apt-get install -y curl.
Part 3
Install and launch
Before you explicitly enable live trading in step 12, setup does not place trading orders.
10
Install with one command
The installer retrieves the machine number, markets, and entry windows.
GREEN
sudo bash install-green.sh
VOLUME · instead of the GREEN command
sudo bash install-volume.sh
Use only the commands labelled for your installed version. GREEN and VOLUME have separate services, configuration and dashboards; never share a wallet between them.
The script asks for the wallet count, then each address and key from step 6. Key input stays hidden and is stored in GREEN: /opt/entropy-green/.env · VOLUME: /opt/entropy-volume/.env with permissions 600.
The installer then:
installs dependencies and clock synchronization;
checks archive integrity and performs an offline program check;
creates a dedicated user entropy (GREEN), entropyvol (VOLUME) and systemd services;
retrieves the build and machine settings, checks wallet configuration, and prints markets and entry windows.
Import wallets from a file
Create ~/wallets.txt with one wallet per line: address and key separated by a space. Install using it, then remove the temporary key file:
The script checks the settings again and asks you to type the exact Russian confirmation ДА. The bot and dashboard then start, with automatic service restart after failures and server reboots.
● entropy-green.service - Entropy GREEN trading bot
     Active: active (running)
Trades occur when qualifying spreads appear. Timing varies; nights and weekends may be quieter. Before launch, the account must be in Unified Account mode with sufficient collateral.
13
Open the dashboard
The dashboard listens locally on the server. Access it through an SSH tunnel.
on your computer · use a new terminal window and keep it open
GREEN
ssh -L 8765:127.0.0.1:8765 ubuntu@SERVER_IP
VOLUME
ssh -L 8766:127.0.0.1:8766 ubuntu@SERVER_IP
Then open GREEN: http://127.0.0.1:8765 · VOLUME: http://127.0.0.1:8766 in your browser. The dashboard shows positions, balances, turnover, and updates.
i
The installer can also expose an authenticated gateway: GREEN on port 8443, VOLUME on port 8444. Use the login printed by the installer. Do not expose internal ports 8765/8766. If the browser cannot verify the gateway certificate, use the SSH tunnel rather than bypassing the warning.
The update workflow checks existing positions before switching versions.
Release announcements and bot updates in our Telegram channel: @entropyb0t ↗.
Dashboard → Updates → Check for updates.
If a new version is available, click Update.
The updater verifies the signature and checksum, pauses new entries, waits for active trades to finish, and restarts. If the candidate fails, it restores the previous version.
sudo sed -i 's/^LIVE_TRADING=.*/LIVE_TRADING=false/' /opt/entropy-green/.env
sudo systemctl restart entropy-green
VOLUME
sudo sed -i 's/^LIVE_TRADING=.*/LIVE_TRADING=false/' /opt/entropy-volume/.env
sudo systemctl restart entropy-volume
Use this only after checking that the selected account has no open positions or orders. This disables automated trading, including protective position management; it is not an entry-only pause. Do not use it to leave positions unmanaged. To enable trading again, use step 12.
A key was exposed
If an agent key was exposed, revoke the agent at app.hyperliquid.xyz/API and create a replacement (step 6). If the owner's private key was exposed, secure the funds using a new wallet.
Open the configuration: GREEN: sudo nano /opt/entropy-green/.env · VOLUME: sudo nano /opt/entropy-volume/.env.
Replace the affected wallet key: wallet 1 uses HYPERLIQUID_AGENT_PRIVATE_KEY=; wallets 2–9 use WALLET_2_AGENT_PRIVATE_KEY= … WALLET_9_AGENT_PRIVATE_KEY=.
Save with Ctrl+X, Y, Enter. Restart with: GREEN: sudo systemctl restart entropy-green · VOLUME: sudo systemctl restart entropy-volume.
The server rebooted
Enabled services start automatically. For each installed version, run its status command from step 11 and verify that position recovery completed.
Uninstall the bot
Before uninstalling, verify that the selected wallets have no open positions or orders. Uninstalling stops their management and does not close exchange positions. Run only the command for the product you intend to remove.
A configuration backup remains in GREEN: /root/entropy-green-backup-* · VOLUME: /root/entropy-volume-backup-*. It contains keys; keep it protected and do not share it. The machine identity is retained for reinstallation. The other product is not removed. Do not add --purge for ordinary removal.
Error messages and next steps
Message
Action
“archive built for …, server is …”
Request an installer matching the server architecture
“checksum mismatch”
Download the archive again (step 9)
“settings check failed”
Check addresses and keys in GREEN: /opt/entropy-green/.env · VOLUME: /opt/entropy-volume/.env, then run --status
“update channel not configured”
--set-channel URL — request the channel URL from us
“manifest signature verification failed”
No update was installed. Contact support
“restored version …”
The candidate failed and the previous version is running. Send the sanitized log from GREEN: /var/log/entropy-green-update.log · VOLUME: /var/log/entropy-volume-update.log
Describe the issue and send sanitized output from these commands. Review logs before sharing them.
×
Never send anyone GREEN: /opt/entropy-green/.env · VOLUME: /opt/entropy-volume/.env, backups from GREEN: /root/entropy-green-backup-* · VOLUME: /root/entropy-volume-backup-*, private keys, seed phrases, or sensitive wallet screenshots. We will never ask for them.
Ready to start?
Support, partnership proposals and bot updates: @entropyb0t ↗.